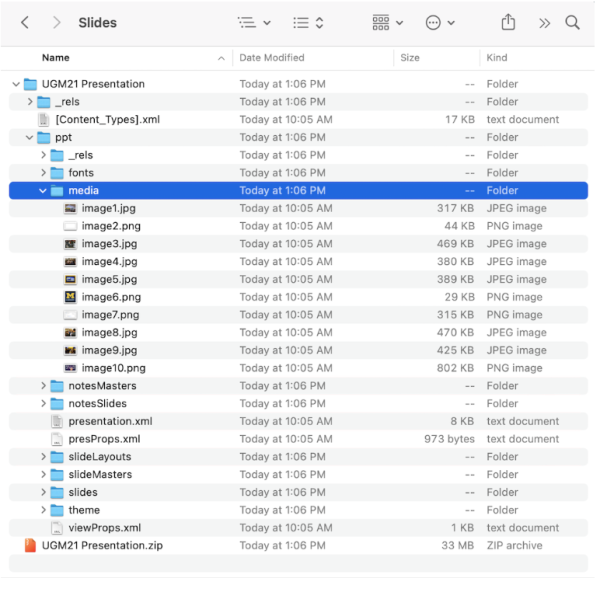
For this month’s Tech Tip, I’m sharing a tip that I’ve found very useful over the years. It’s a simple technique to extract all images (and other content, such as the fonts used in the presentation) from within PowerPoint files just by changing its extension.
You can do this with files you’ve saved directly from the Microsoft PowerPoint software, or from Google Slides that you’ve downloaded as .pptx files. No additional software is needed, and it works on both Macs and PCs.
Here are the steps to rename a .pptx file to .zip so that you can extract images:
- Right-click (PC) or control-click (Mac) on the PowerPoint file that you want to extract images from.
- Choose the “Rename” option from the dropdown menu and change the file extension from “pptx” to “zip”.
- If you receive a notification message saying “If you change the file extension, the file may become unusable. Are you sure you want to change it?”, click “Yes”.
- Open the newly renamed .zip file with your preferred compression software, such as WinZip or WinRAR.
- Navigate to the “ppt” folder within the compressed file.
- Locate the “media” folder within the “ppt” folder. This is where the images are stored.
- Click on the images you want to extract, and then drag them out of the compressed file and onto your desktop or other folder on your computer.
That’s it! You should now have successfully extracted images from the PowerPoint file.
February 6, 2025 Update – It appears that something may have recently changed with the built-in Archive Utility on Mac as it can no longer extract the zip file. However, by using a different archiving utility, like Keka, you should be able to successfully extract the images from the zip file as outlined above.
Do you have any techniques or workflows that you use on your computer on a regular basis? Please share in the comments below!
Have a cool app, tool, or tech tip you’d like to share? Contact Chase Masters. Please note that Tech Tips are personal recommendations and might not be officially endorsed or supported by U-M.
